Application of industrial-grade high-precision three-dimensional scanner to the development of new product detection for casting size
Application of industrial-grade high-precision three-dimensional scanner to the development of new product detection for casting size
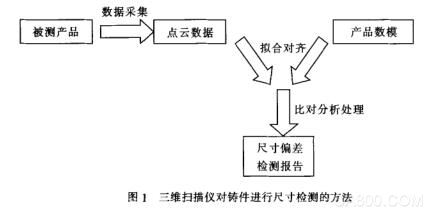
The product is scanned three-dimensionally by means of a three-dimensional scanner and then the point cloud data is collected into a computer. In the scanning process, parameters such as changing the device configuration can be set to improve the scanning accuracy. The higher the precision, the more points are collected. Lastly, the digital data was constructed from the collected point cloud data, and the constructed digital model was compared with the product digital model. Operation as shown:

After aligning the model number with the product number, the product is compared with the three-dimensional and two-dimensional dimensions. The three-dimensional dimension comparison includes color deviation, three-dimensional dimensioning, and geometrical tolerance tolerance. The two-dimensional dimension comparison can be used to select a section at any position of the product and to mark the feature distance, radius, and angle of the section.

After all necessary 3D dimensional inspections and annotations are completed, specific inspection reports can be generated. If more than one piece of the same product needs to be tested, you can use the previously done test as a template. Replace the original scan data with new scan data and run an automated production report to generate a new test report based on the new scan data.
Industrial Application of High-precision Three-dimensional Scanners for Detecting New Sizes of Casting Sizes
During the development of new products for traditional castings, the inspection of casting dimensions is an important and indispensable step. The traditional method is to carry on the scribe inspection to the casting, but this kind of scribed inspection method is limited to measure the partial size of the casting, some curved surface shielding surface and other parts are difficult to measure the size. And more and more products now only provide 3D data, and underlined inspections without 2D drawings have significant limitations. Therefore, the use of three-dimensional scanning is more and more convenient and practical.
1) Casting inspection
The scan data of the cylinder and the three-dimensional numerical model are respectively transferred to the analysis software. The alignment method adopts a reference and the features are aligned. First, use the cylinder horizontal machining positioning point reference to fit. Then align the alignment automatically. The choice of method for fitting the alignment and the selection of the reference depend on the specific product. The machining positioning point should be the preferred machining positioning point. The principle is shown in the figure.

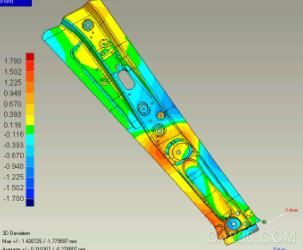
After the fitting is completed, a 3D comparison can be performed to generate a color deviation map. Through the color difference zone of the figure and the color of the casting surface, the dimensional deviation of the component can be seen intuitively, and it is easier to help the technician to analyze the part size.
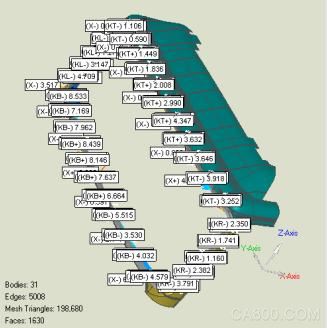
For some positions where you want a specific dimensional deviation, you can create a comment so that you can display the specific value of the deviation here. Pass value. We can check if there is enough machining allowance in some locations that need to be machined. It is possible to check the planeness of certain planes by means of geometrical tolerance tolerances, and to check some geometric tolerances such as the positionality of certain riders. Large deviations in size can also be used. Make more notes. According to the size deviation of the annotation to find the law of dimensional change.
Key dimensions such as barrel diameter and center-to-center distance between cylinders can be easily measured by feature creation and 3D dimensioning.2) Sand core detection
In the development of new products, the size of the sand core that has been overturned by the mold will change over time. This includes deformation of the sand core and dimensional deviations caused by long-term core box wear. It has been difficult to accurately measure the size of a sand mold in the past, so it is difficult to grasp the size of the sand core. The use of three-dimensional scanners for non-contact measurement makes it easy to measure the size of the core.
In the rapid trial production of castings, many sand cores are manufactured in a moldless manner. The size of the core is not stabilized by the mold core, so many tests are required. After testing it. The size of the sand core can be clearly understood. If the local size of the sand core exceeds the required range, partial modifications may be made based on the test results.
Application of industrial-grade high-precision three-dimensional scanner to the development of new product detection for casting size
Indoor Fixed LED Display is a popular product for its high quality, every year sold to at least 80,000 pieces around the world, including Europe, North America, southeast Asia.Compared to other indoor LED display in the market, its biggest advantage is that it can display high-definition images while maintaining low power consumption.Besides, it adopts Die casting aluminum cabinet which is ultra-thin and ultra-light and owns good heat dissipation.Easy to install and maintain and suitable for multiple indoor scenes.
Application:
* Business Organizations:
Supermarket, large-scale shopping malls, star-rated hotels, travel agencies
* Financial Organizations:
Banks, insurance companies, post offices, hospital, schools
* Public Places:
Subway, airports, stations, parks, exhibition halls, stadiums, museums, commercial buildings, meeting rooms
* Entertainments:
Movie theaters, clubs, stages.
Indoor Fixed LED Display,Led Wall Display,Video Wall Display,Outdoor Led Screen Display
Guangzhou Chengwen Photoelectric Technology co.,ltd , https://www.cwstagelight.com
