Analysis of migration steps for different models of STM32 series MCU
Porting of different models of STM32 series MCU!
first step
Replace the startup file:

Second step
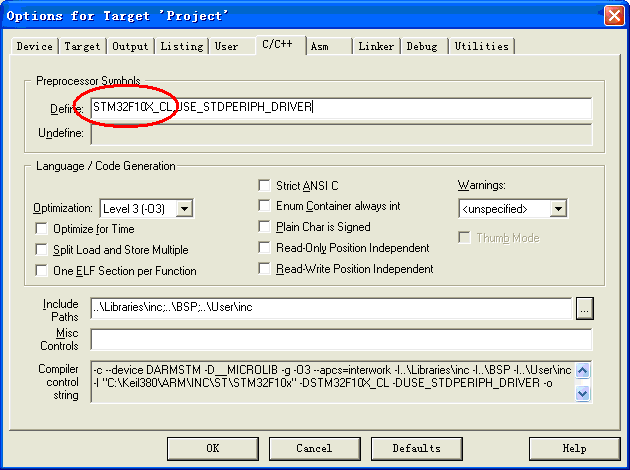
Modify the macro definition:

figure 1
Or modify stm32f10x.h
The specific modifications are as follows:

figure 2
third step
Modify the system main frequency:
File: system_stm32f10x.c
The specific modifications are as follows:

image 3
the fourth step
Modify the external crystal source:
File: stm32f10x.h
The specific modifications are as follows:

Figure 4
the fifth step
The timer needs to be modified according to the system main frequency modified above.
other:
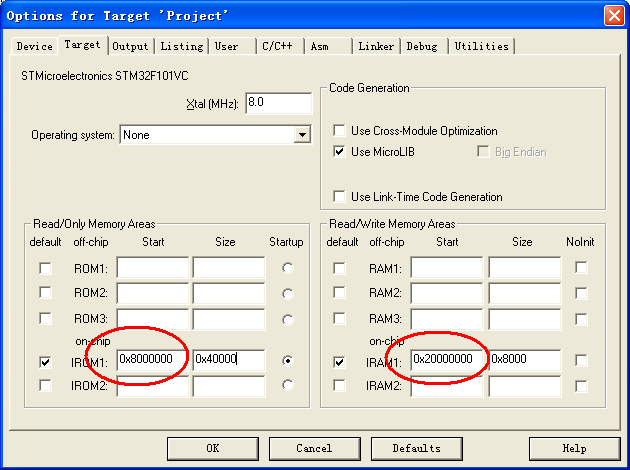
Modify the flash address
File: misc.h
The specific modifications are as follows:

Figure 5
Consistent with the following configurations:

IAP setup steps
I. IAP project settings
1. Modify the button trigger button in main
2, modify the download serial port
Second, download the project settings
1, modify the program entry address
Find NVIC_VectTab_FLASH and change it to: 0x08002000
2, modify options
1) Open the Target tab and change Start and Size to 0x08002000 and 0x3E00 in IROM1 respectively.
2) Open the User tab in Run User Programs Before Build/Rebuild, check Run#1 and fill it in
D:\Keil\ARM\BIN40\fromelf.exe--bin -o ./obj/Project.bin ./obj/Project.axf
Where Project.bin and Project.axf are the same as the Name of Executable in the Output tab.
Third, how to use IAP
1, set the super terminal baud rate to 115200
2. When you need to download, press the Tamper button and press the reset button. The HyperTerminal prints out the help information.
3. Select the file to be sent. Select Y_modem as the protocol and choose to deliver it.
Delay modification

Use J-Link debug settings

Figure 7
J-Link does not connect to the target board properly
You can try the method (restore factory settings)

flyphotography
SHAOXING SHANGYU FEIXIANG PHOTOGRAPHIC CO.,LTD , https://www.flying-photography.com
